The Invitation Pt.2

Monday, November 19th, 2018


The Invitation Pt.2

This one is actually done/finished for a long long time now. Over the past year I constantly revisited it, to fix a lot of tiny things, I wasn’t happy with and now finally reached a point where I am. It’s the second piece of my ‘Invitation’ series. I tried to venture into a different, more character based, direction and wanted to find out how good Vue works with that. Unfortunately not too good. So I had to find workarounds for my technical issues. Especially rendering the skin. Another goal was to create a scene like that as tasteful as possible. With a flair of what I love so much… Scifi.

Technically I worked with DAZ Studio to create the pose I had in mind. A lot of time went into that part, to make it work as good and natural as possible. Not sure if I succeeded entirely. But it’s close enough to what I want. Exported and imported the character into Vue, where I did set up the scene. The door kind of objects were done in C4D to frame the character and give that scene a scifi touch. Rendering went through several passes that were stitched together in Photoshop. A lot of post work, fixing, color tuning was the next step. Overall I’m fairly happy with how it turned out.

8000×5333 – Vue – Photoshop – DAZ Studio – Lightroom

The artwork on:
DeviantartArtstationCGSociety

wallpapers available

Regards

signed

The Invitation Pt.1

Thursday, January 12th, 2017


The Invitation Pt.1

The first one for 2017 is an experiment from early last year and something quite different from my usual stuff. Normally I focus on the environments and add characters to make these environments feel alive. So they are usually just an addon. With this one I wanted to focus on a character instead of the environment. Without making the environment too boring though. I must also admit that I did not sculpt the lady by hand. I used DAZStudio for it. So I definitely admire people who can do that stuff from scratch. However, I did not use a DAZ pose or character preset! There went a lot of work into posing and the proportions of that lady. Tons of testrenders for lighting setup and material checking. A lot of detail work that went into this lady. I wanted this to by sexy, treating the pic like a fine art nude photo shoot of sorts. Everything as tasteful as possible, without it to appear too ‘revealing’. Hope I got that part right.

Technically the figure and its pose was done in DAZ Studio and then exported for use in Vue. There I did some heavy material tweaking and tried to get the light right. The render happened in 9000×6000 and even if it is a quite simple scene, there went some extra time into the Photoshop process. Mainly to fix things and to overpaint small areas. I also rendered multiple passes of the scene and even worked with an HDR pass. The latter helped to get the skin tones right. In the last stage of creating this one, Lightroom helped me to get the colour I had in mind right.

This pic is the first one in a three part series. And, probably the best one. But that is a definite taste thing. :D

9000×6000 – Vue – DAZ Studio – Photoshop – Lightroom

Print Detail

wallpapers available

The artwork on:
DeviantartArtstationDrawcrowdCGSociety

Regards

signed

Return To Chronos Keep

Thursday, October 6th, 2016


Return To Chronos Keep

I started this one shortly after I finished reading ‘Hyperion Cantos’ by Dan Simmons. Easily some of the best scifi you will ever read. So, go… get it and read it if you haven’t! I decided to try myself on a scene from the book (and there are so many good ones!). Late in the story our group of characters is sorta kinda trapped at a very important place and they need to stay there. Unfortunately food and water runs out and they decide to send 2 of them back to a fortress kind of place to get food and water. So my scene shows one of them on their way. What we see is how I kind of imagined the environment looking like in that part of the book. In the book it’s sort of described as a desert with some neat atmospheric effects. That ‘atmospheric effects’ part got me. In the end it’s not a super exciting scene I guess. I had my fun playing around with it though. =)

Technically it’s a mix of 3d and 2d techniques. Created with Vue, The Plant Factory, World Machine & Photoshop. I used Apophysis renders to visualize the atmospheric effects. After rendering the scene plate I, as usual, did go back to add lots of elements I rendered separately. I also oriented on the descriptions in the book regarding lighting and colours. Got that part good I think. =)

6500×2967 – Vue – The Plant Factory – World Machine – Photoshop – Lightroom

This pic is part of The Luminarium’s 28th Exhibit. Some amazing work by some great digital artists in there. Check it out here!

Plate
Scene Setup
Print Detail

The artwork on:
DeviantartArtstationCGSociety

CGTrader Digital Art Competition

wallpapers available

Regards

signed

Greenland I

Saturday, September 3rd, 2016


Greenland I

Here we have an experiment I did a long time ago. 2011 to be exact. I guess I never really was happy with it. The goal was to create a nature scene. And some parts in here I do really enjoy. But the overall picture is too cluttered and lacks composition. However, I decided to dig it out and play around with the atmosphere and colors a little. In the end I decided to go for a more vivid color scheme to give it some fantasy character. It’s ‘presentable’ now I guess. =D Still no masterpiece though.

Created and rendered with Vue and a load of detail fixing in Photoshop. I also re-rendered a couple of elements to bring in some additional detail here and there. So ultimately it may not be the result I wanted but still, I invested some extra work for it nonetheless. I don’t know exactly why but the water area took forever to render. =D

Vue – Photoshop – Lightroom – 6000×3100

Had my fun with this one and hope you enjoy the view. :)

Wireframe
Plate

wallpapers available

The artwork on:
DeviantartArtstationCGSociety

Regards

signed

Organica

Thursday, December 17th, 2015


Organica

This one started as an experiment. Like many other pics I do for some reason. I wanted to dig a little deeper into a tool called The Plant Factory (TPF). A software created by the guys who also run Vue. After finishing this pic I wouldn’t say I’m an expert in TPF… but I learned something for sure. To a point where it already helps with other projects. However… I used TPF to make roots grow all over the scene. To make it look as if nature decided to overwhelm this place to a certain degree. So ultimately this project was perfect for the then current ‘Organics’ topic of the Luminarium artgroup. It could be seen as a companion pic to my ‘Terraformer’ piece. Maybe it’s even the same planet!!!??? =)

The scene base was created with C4D and Vue. A lot of importing/exporting with The Plant Factory and tons of overpainting and fixing with Photoshop. The last part more than usual. Therefor I decided to play with a more stylized look and made it appear a little more painting like. A lot of time went into refining small elements to make it all look consistent.

Is this experiment a success? I’m undecided. While it sure does show something I had in mind for this scene, there are a couple of technical things I would do different today. Of course I would… because now I know the stuff I leaned from creating this picture. :D

6571×3000 – Vue – The Plant Factory – Sculptris – Photoshop

Plate
Scene Setup
Print Detail

This pic is part of The Luminarium’s 27th Exhibit. The topic was ‘Organics’. Amazing work by some great digital artists in there.
Check it out here!

The artwork on:
DeviantartArtstationCGSociety

wallpapers available

Regards

signed

Escape

Wednesday, June 11th, 2014


Escape

This one started out as a commission. I just had done and finished up another one for that client but with my attempts on a second one I didn’t manage to hit the right look that they wanted. We decided to leave it be and I asked if I could use one of my attempts for a personal approach. We agreed, parted ways and I carried on working on my idea since I felt that I was on to something with that picture.

It surely paid off when I look at the final version now. I always wanted to try myself on some kind of park area. A bright, peaceful and not too stressy picture setup with some nice depth. Not sure if I succeeded with the ‘stressy’ part but the depth works really well I think. Again there’s not much of a story behind it but I sorta imagine this huge park area as some sort of point of escape for all the people living in the city that is lurking in the background. It must be a great place to relax your mind and body a bit. The lady we see even got out of her shoes and walks around barefoot. So I’m sure it’s a great place to find peace of mind and such.

Technically it’s my usual Vue & Photoshop combo. The terrains were done with Worldmachine and the big rocks with Sculptris. Sculptris is a neat tool by the zBrush people. It’s basically a reduced version of zBrush and ideal for 3d sculpting beginners. It was more than sufficient for what I needed it for in this project. I also worked with a lot of masks to align the trees for the park. There went a lot of fine tuning into it. Mainly to get the positions, order and number right. In Photoshop the usual fixing, overpainting and additional texturing happened. Ultimately the overall result is satisfying. It’s not perfect but at some point you have to stop working on a picture. I, in fact, stopped working on it an hour ago. After a longer break where I considered the picture final. But you can always find something to tune and fix. I basically force myself to stop working on it by releasing it to the public. =D

Enough babble… I hope you like this one and enjoy the view!

6000×2550 – Vue – Worldmachine – Sculptris – Photoshop

Print Detail

History

wallpapers available

Regards

signed

Strange New Worlds

Monday, December 9th, 2013


Strange New Worlds

Here we have a pic that is lying on my hard drive for over a year. This one is actually my first experiment with using 3d fractal objects generated with Xenodream. If you know my gallery then you’ve seen these already in other pictures. The reason I held this picture back simply was/is that I’m not too happy with it. Even though I can see some good qualities in it. That’s why I now said “To hell with it… let’s make it public”. =D People’s tastes are different and maybe there are folks out there who like and enjoy it more than I do, or maybe even inspires them.

Beside the experimental factor, the goal of it was to go a more fantasy route with it. I think I at least succeeded with that. The composition is what bugs me most. It’s a little messed up. Nonetheless there are some technical things that look pretty cool I think. As mentioned before I created the spiral rock shapes with Xenodream and exported them into 3d objects. Those I took into Vue and created a scene around them. I worked with ecosystems to get foliage and trees into the scene. I also applied ecosystems to the spiral rocks to give them some vegetation growing on them. That makes them look more natual. Overall it was a little too expermienty and I was just toying and playing around too much. A lot of work happened in Photoshop as well. Just 2 weeks ago I added a last background detail and had to force myself to stop thinking about it and start considering it to be DONE.

Anyways… I hope you enjoy the view and maybe enjoy the little things like I do. =)

Xenodream – Vue – Photoshop – 3252×4600

Plate 1

Plate 2

Plate 3

Regards

signed

Echoes

Tuesday, November 19th, 2013


Echoes

With this one we have another more experimental piece. After doing my Arcady’s Epiphany piece I still wanted to do something with the fractal 3d object I made with Xenodream. The Scifi nut that I am, it went into that realm again. The initial idea to the pic came when I had a sleepless night. You know these nights, when too many things go around in your head. The first pic I had in my head was just a hole in the ground with some structure in the middle of it. Later then came the idea making the structure some sort of scientific expedition, looking for something or investigating weird rock formations. I even started to write a short story but decided to post it later on my site. That story really needs polishing and who knows if I can find the time for it.

From a technical viewpoint this one was a monster. Sometimes I wonder how my computer manages to handle the stuff I throw at it. The pic was created through several separate Vue scene files. Basically separate files for the building and landscape. And one big file that contained all objects and was used for the render. The big one had 3gb size in the end. That’s huge even for my standards. A separate cloud pass (took almost 44hrs to render) was rendered to enhance the atmosphere on the surface. This pic was also the first one where I heavily used 3d lights directly in the scene. Normally I tend to add this stuff via Photoshop. First testrenders indicated that it wouldn’t work for this one and the look I was going for. The terrain was created with Worldmachine and did a nice job with the overall detail. Speaking of detail… there is a crazy load of it in there. I don’t know what was going on with me. Especially considering how painful it can be to implement certain details. I even tracked down the font that was used on the USS Sulaco in the movie Aliens. I wanted that for the names of my stations as well. Check out the print detail preview on the bottom of the post to see what I mean. Crazy, right? Last but not least of course Photoshop was used to basically pimp up the render with some postwork, effects and slight overpainting here and there.

6000×2739 – Vue – Photoshop – Xenodream – Worldmachine

Plate 1

Plate 2

Plate 2

Print Detail

wallpapers available

Regards

signed

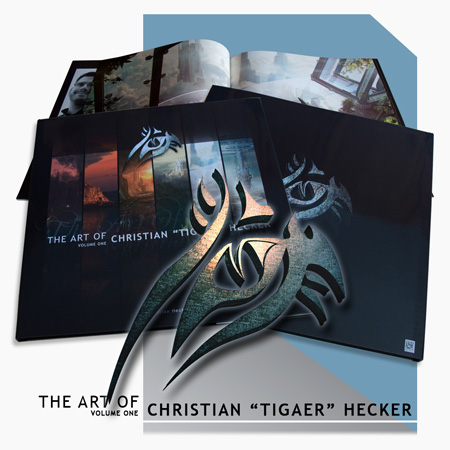
The Art Of Christian ‘Tigaer’ Hecker – Vol. One

Monday, August 6th, 2012

The Art Of Christian 'Tigaer' Hecker

Yet again I have to announce something that makes me proud. For the past year I sat down and created a neat little art book. This book contains 9 of my personal portfolio favourites on a very high quality 30×30 cm / 12×12 inches paper. All of them on two-page spreads. So basically 60cm wide. That gives some amazing detail! Additionally it’s packaged in a very well produced and manufactured binding. For details feel free to check this page. There you can find all necessary info about the book as well as detailed photos.

Check The Preview – Here

Buy The Book – Here

Regards

signed

Lake Firefly

Thursday, December 8th, 2011


LAKE FIREFLY

This picture was a submission for ‘The Luminarium‘ Artgroup. Their topic was ‘Asylum‘. My interpretation of the meaning can pretty much be seen in this picture. It’s a more peaceful approach. Here we have two people on a field trip to find some peace. But the environment looks a little different don’t you think? Of course I wanted to put in a little Fantasy/Scifi component. So our two friends here are either in the future on a distant planet or in an alternate universe. But that’s a taste thing. =D

Technically this picture was the first one I created with the Vue10 release. The random rock creator works really nice and is a good addition to the tool. The huge wing like mountain thingies were created with XenoDream. A very interesting tool that I might explore a little more in fhe future. Of course a lot of post work with Photoshop again. I even played around with creating some alien looking trees there. Maybe that was the christmas spirit coming through a bit. Just a little bit. =D This may also be the last piece of art for 2011 and I think it gives a nice conclusion with its mood.

Vue – Photoshop – 5000px wide

Print Detail
Plates and Parts

wallpapers available

Regards

signed