Red Dawn – Camera Mapping In Vue

It’s been quite a while since my last try in animating a painting of mine. While the older tries were quite respectable i really wanted to push it this time. I read, heard and saw a lot about camera mapping and its theory. Now Vue has the ability to do camera mapping (also called camera projection) too. This allows you to lay a painting on a geometry and allows you to create limited camera moves with nice perspective shifts. Depending on how much work you spend on it. I surely spend a lot for this one.
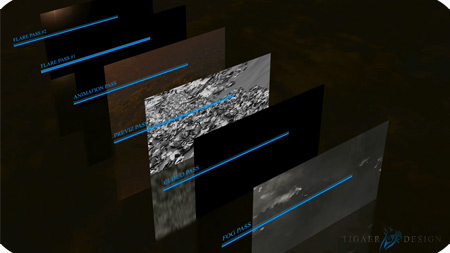
I worked on this project for almost 2 months. Not on and off though. Partly because the rendering out the different elements took ages. Especially the volumetric things like fog and clouds. And these were rendered on very low quality settings. Since motion blur is smoothing out certain things it was not too important to render the volumetrics in unnecessary details. While the rendering of the projected painting took 6hrs for 511 in 1080p frames, the fog pass took about 12-15hrs for 511 frames. And i didn’t render it once. I had a lot of testrenders for each of the passes. Now i can roughly estimate how much CPU power a big VFX studio must have.

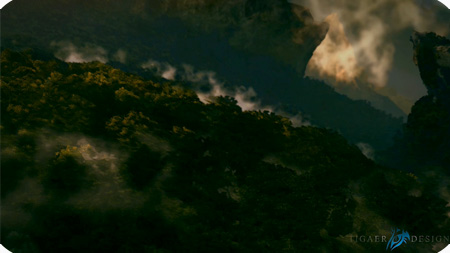
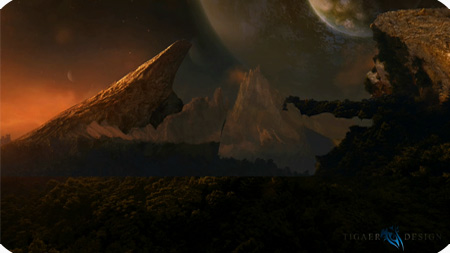
I chose my Red Dawn painting because in the painting i didn’t change much of the actual Vue render. So the geometry in the Vue file still fitted the painting nicely. I removed the forground element though since it wasn’t a good addition to the camera move i had in mind. I already had an animation project in mind when i did the painting. Now i had the right ambition and time.
A lot of postwork got also done in After Effects. Especially the stitching of the different elements. The blending of the render passes. Vue is able to render out the animations in uncompressed avi format. That means for 511 frames in 1080p it resulted in a 3gb file. Unfortunately the files were corrupted and not to open by any player. I reopened these files in VirtualDub, which was able to read the files, and saved them through VDub as avi again. That made the files recognizable for all players and After Effects. I don’t know what was going on but as soon as the animation video file reached 1gb, it made them uneadable. Maybe some avi internal limitation thingie from ancient times. I have no idea.
Ultimately i must admit that i’m not 100% happy with the end result. But that’s because of technical and time issues. You could work forever on stuff like that. Nonetheless it is a nice step forward in comparison to my earlier tries.
Hope you guys enjoy this shorty. For me it’s always a special thing to see an animation of one of my paintings. It’s like bringing these static pintings to live. That’s a cool thing!
Download – 720p Quicktime – 160mb
Download – 540p Quicktime – 80mb
Online – Vimeo (HD)
Online – Youtube (HD)
Thanks for your attention.
Regards


February 20th, 2010 at 22:23
Nicely done. I’ve had bad experiences rendering out depth maps and alphas from vue 8. They seem so shoddy, so props to you for getting it right. Everything overall seems a little slugish. Titles take way too long, the breakdowns of the multi-passes take way too long, the kerning on the title’s main text makes my eyes bleed. Overall just speed everything up except for the actual camera moves in both sequences. All the breakdowns and titles, speed em up. The visuals are superb and the mood and lighting work well. Even the lens flare works.
As for technical issues, I’d recommend always rendering out frame sequences instead of .avi’s or anything else. This way, should a render die on you, you’ll have what it left off on, and not have to rerender all over again. If you must render out a movie, I’d not go the .avi route in the first place and try .mov’s. you could have also probably sped up your fog layer rendering by using something within after effects to generate the fog. For example, export camera data into ae, then use particular from trapcode and put in fog elements as the particle type. Much faster rendering and would look practically the same.
Some day, I’d love to collaborate with you. I have a lot of compositing and motion graphic experience and I’d love to work with someone who creates such beautiful matte paintings.
Take care.
February 21st, 2010 at 02:20
Thanks for the tips. Well my video creation experience is like nothing… so yeah… the presentation is surely not the best. =D The fog was a bit difficult. I wanted it to be merged with the actual trees so parts of the fog could stay hidden behind the tree geometry. No idea how to do that in AE. Rendering in .avi wasn’t exactly a problem. I had enough space and crashed renders were no problem too. Just stitched together the avi files with AE. My compositing experience surely grew with that project and i’ll take it into a possible new one. But compositing isn’t exactly my goal here. I want to focus more on the camera mapping stuff… everything compositing wise… is a bonus. :)
March 19th, 2010 at 05:12
Absolutely brilliant work. I am a young student who wants to get into the visual effects industry and this camera mapping video was a break through for me, I am stunned by how the reach of the camera mapping could go, and hopefully, when I become a senior Matte Painter, I will have done tons of this stuff.
I will sign up for any mailing list you have, so if you have one, please add me up.
Best of luck.
Artun.
March 22nd, 2010 at 16:20
Sounds like a plan sir :) good luck for all your endeavours and my the force be with you. *nod*
January 24th, 2012 at 09:12
wow…
I immediately sign up for your updates =)
January 24th, 2012 at 14:16
Glad you enjoy my work. There aren’t many updates… especially when it comes to animations. But I’m posting some cool pics every now and then. =D