Digital Art, Paintings, Fractal and 3d work created by Christian Tigaer Hecker. News about the artist and Interviews with Artists like Dylan Cole, Gary Tonge and Syd Mead.
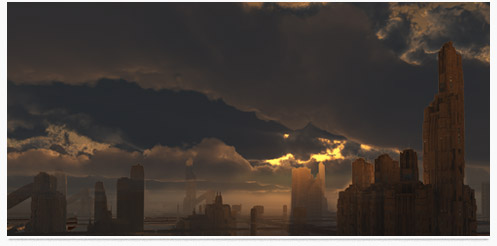
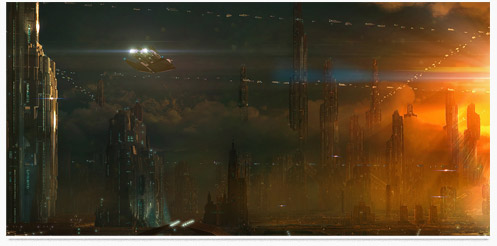
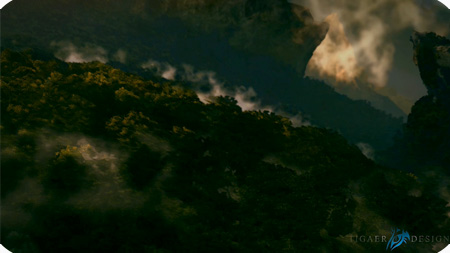
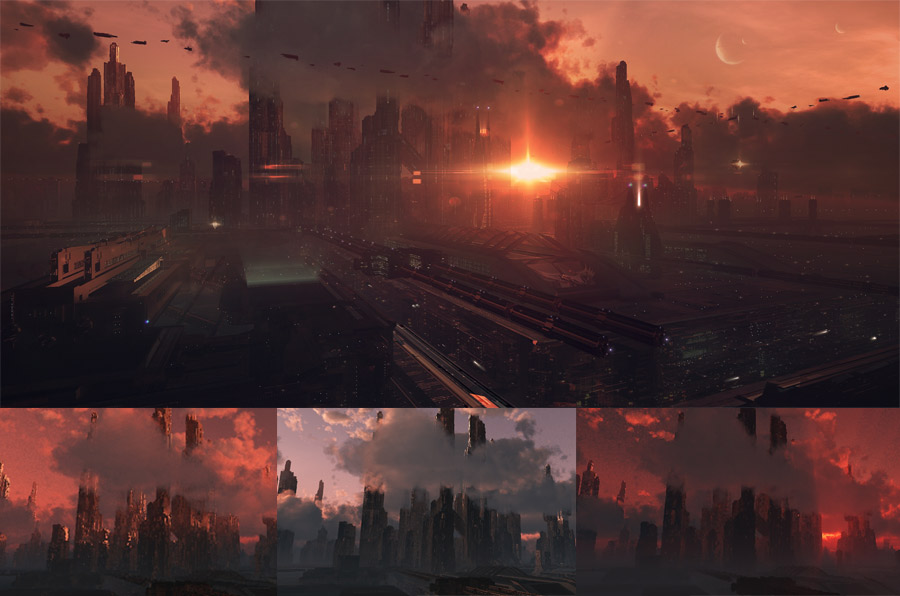
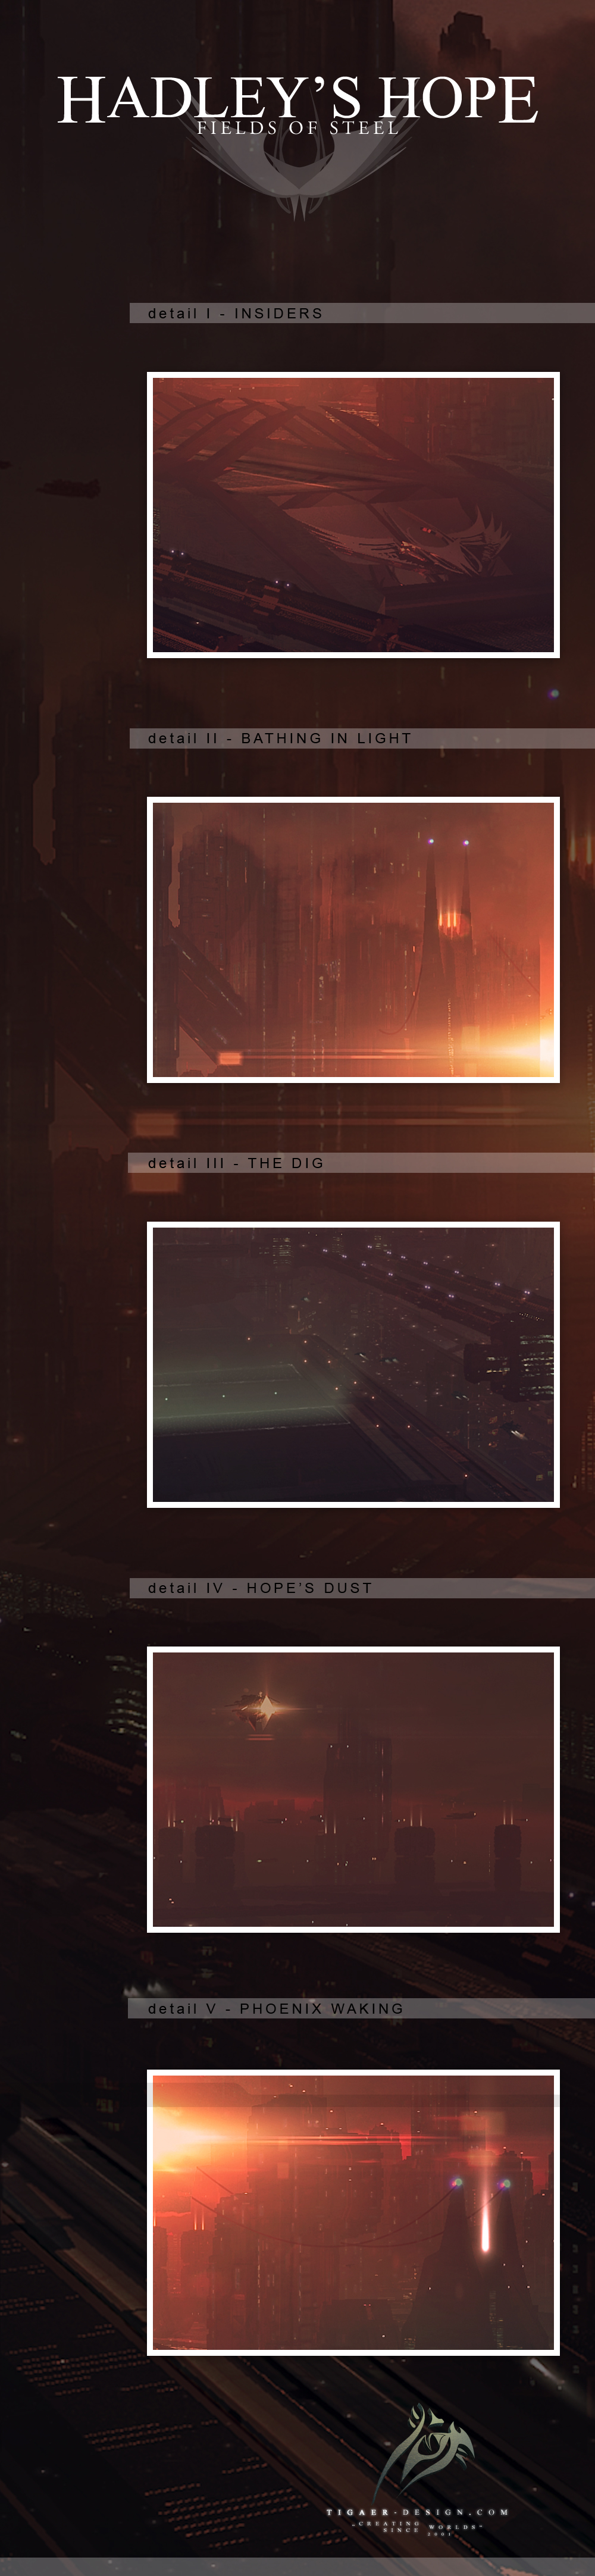
What if kinda sorta maybe Hadley’s Hope in ‘Aliens’ didn’t explode and developed its colony further? But yeah you could say I fell in love with the city I created in ‘Phoenix Rising‘. Since I have built me quite a nice plate in Vue, I had to take another visit. And it could become more in the future. I’m sure you don’t mind as long as some stunning vistas like this one are the result of these excursions. Again I’m wondering why I’m into such megacities. I’m very interested in technology, where it took us in the past and where it may take us in the future. Maybe that’s a reason.
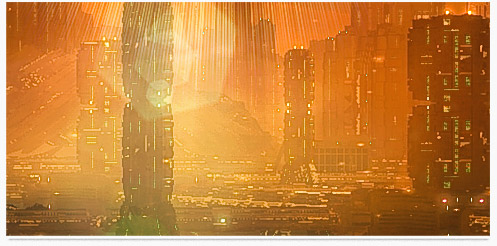
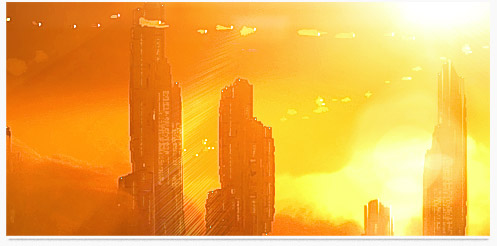
When I started this one I didn’t have a real plan. I was just playing with atmospheres and clouds in Vue and found a nice point of view on the city part we see farther in the back of my ‘Phoenix Rising‘ picture. Started to add more details to that area and moved objects around to find a good composition. Lots of smaller testrenders happening in that stage. When I had arranged everything to a point of satisfaction I started play with the lighting. I really wanted to make it look somewhat photoreal without to lose the usual tension and contrast that I usually get into my pics. I eventually became undecided between a more natural lighted sunset with the light source behind the camera and a real devilish/hellish red backlit situation with the sun shining directly into the cam.
I stuck to the backlit setup because of the tension it created in the scene. Nonetheless I had a problem with visible detail. Since it all was pretty much in shadow. But I wanted lots of details visible! What I did was rendering both lighting situations i had in mind. The one with the sun behind the camera captured all the little details I wanted visible. I took that render pass and layered it above the backlit version and started work both together. That’s a technique I use whenever I want more detail in certain shadowy areas. Of course you can also use the multipass possibilities of Vue to fix those. It all depends on what you want to achieve.
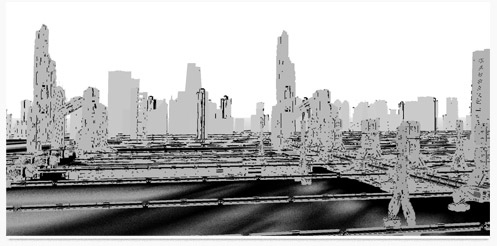
In the end I managed to get a pretty decent result together that can walk hand in hand with my ‘Phoenix Rising’ project. It shows another side of that megacity. A bit darker and dense… almost like you could swim through the atmosphere. Another view I would die for to see for real.
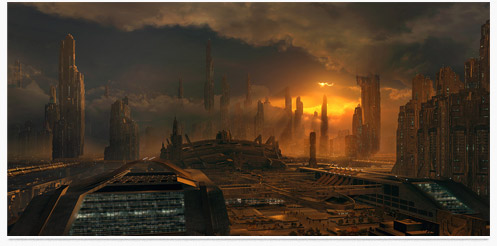
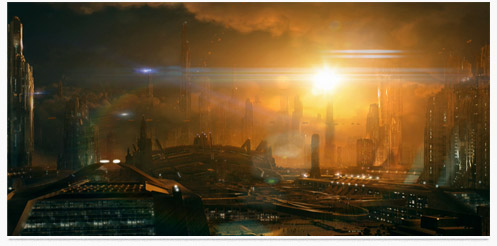
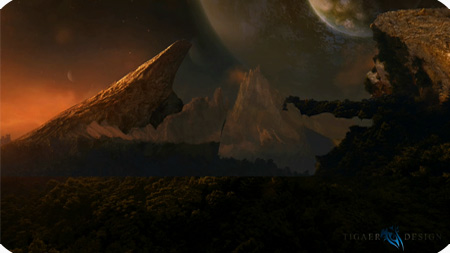
I finished this quite a while ago and finally i got it onto my page. All the time i was thinking about what else i could add to make it even more interesting. Stuff like that can be a trap. Instead of realizing that the pic is pretty much done you keep thinking and thinking. In the end this is a rare pic to find in my gallery. I can’t remember many night scenes i did so far. It’s not that it’s difficult to do them. Somehow i’m more the evening or morning type with my paintings. This picture here has quite some nice details and atmosphere. Could be a scene straight out of Total Recall or Blade Runner.
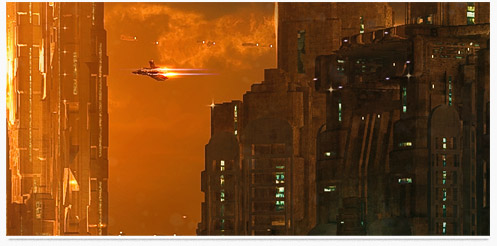
Here we have a picture i created last year for an experimental shortfilm by Chris Bouchard. He’s the guy who made that fairly successful ‘Hunt for Gollum’ LotR fanfilm that created quite a buzz and generated millions of hits. However… what he needed were a few backgrounds and i tried myself on some. We also used my ‘Epica‘ painting, with quite some extensions, as the general background. This picture here was not used like intended but still found it’s way into the film. I really like this one a lot and it’s my favourite of the ones i created. Maybe because it reminds me of that famous Blade Runner scene at the end of the movie.
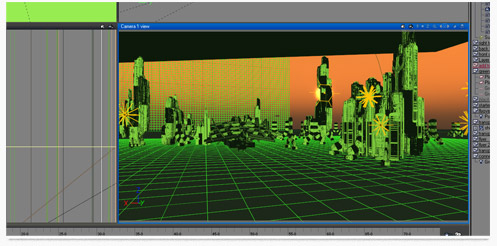
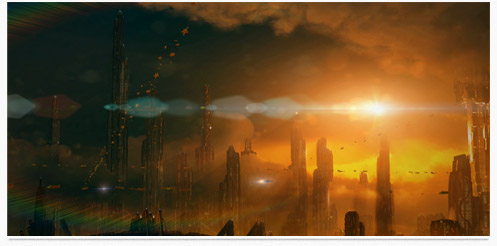
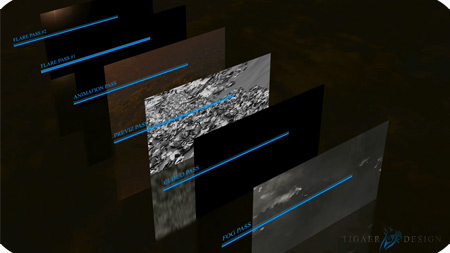
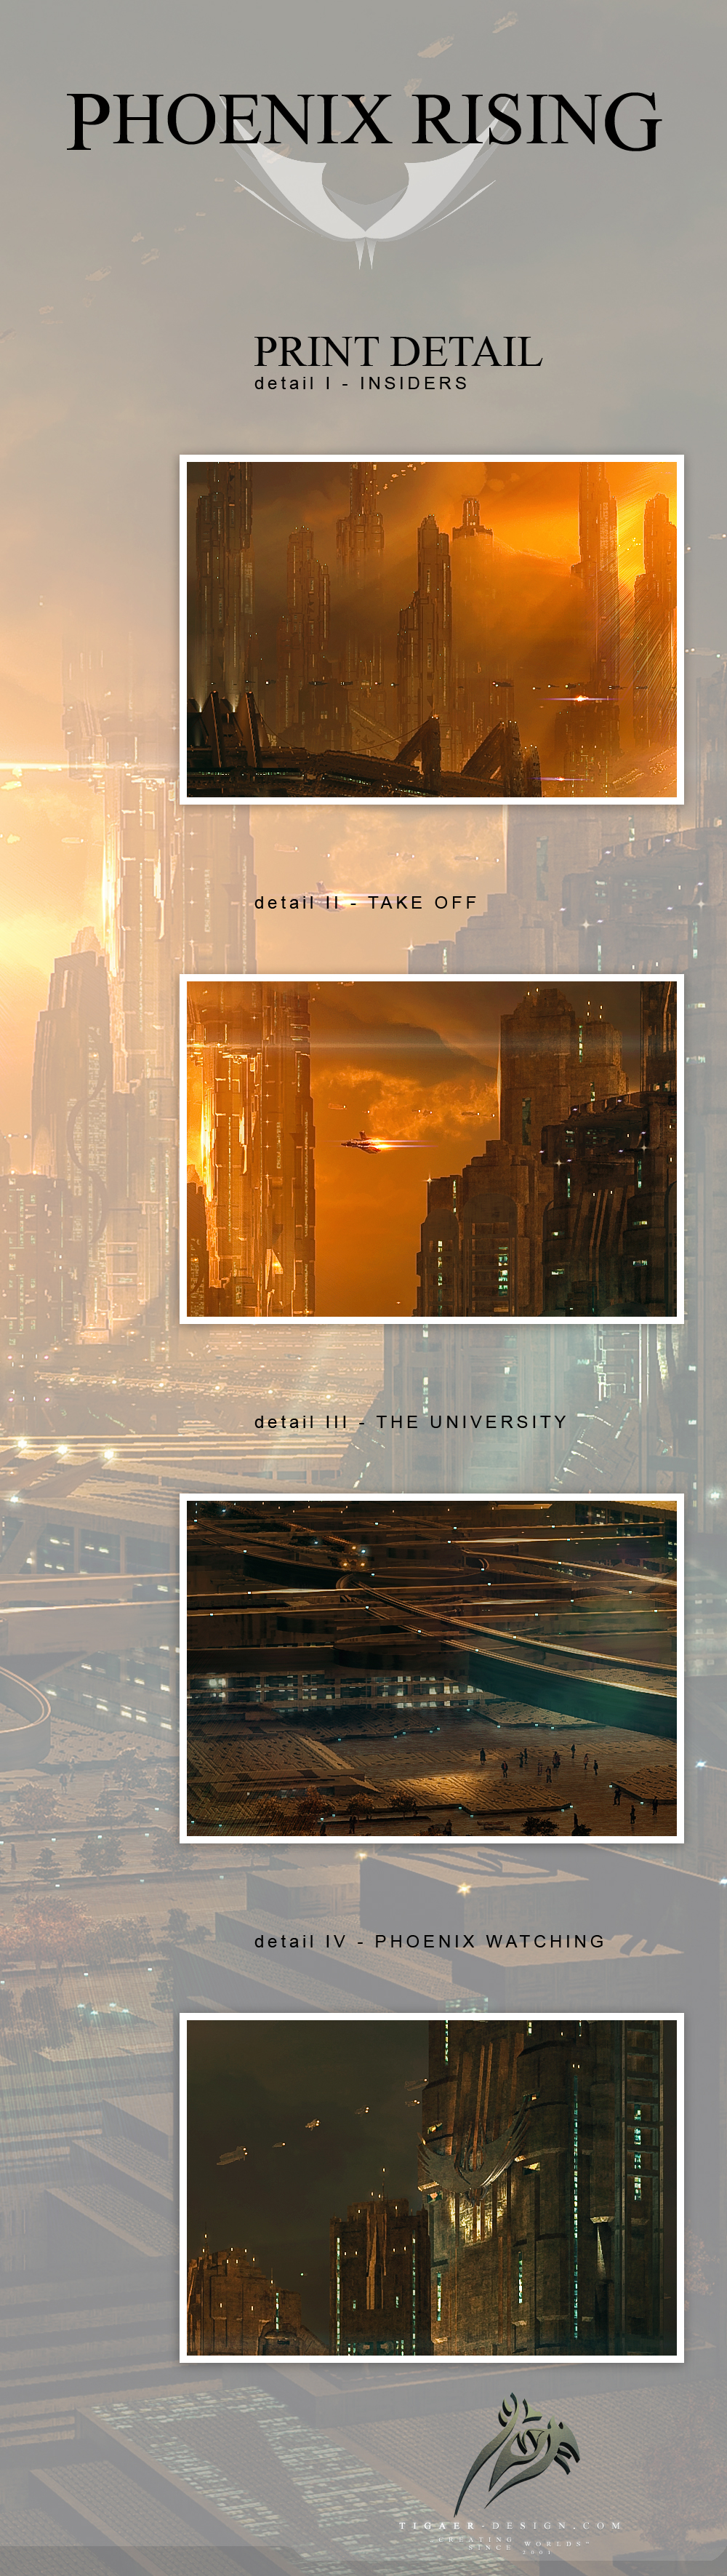
Phoenix Rising is without doubt the largest personal project i ever did so far. The project involved in depth work with Vue 8, Photoshop, After Effects and minor sound editing. The techniques i used were basically digital matte painting oriented and involved camera mapping, editing, motion tracking and of course 2d and 3d work.
In the beginning i was thinking about how i could top the success and personal achievements i got out of ‘Gates To Elysium’. That was late May 2009. That picture was able to gain itself a CGChoice Award on CGTalk and that means a lot to me especially motivation wise. But the question still was how i could top that. And by that i don’t mean prizes or awards. Would i be able to create a similar good or even better piece of work? Something that would satisfy me on all levels…?
November 2009 i started to play with an idea without actually thinking about making this my benchmark for 2010. I fiddled around with Vue since i knew it would play a significant part in the upcoming project. I tossed around some objects and soon packed the scene full to the brim with stuff. Since i still am not the brightest light in 3d modeling i worked much like in the last years project and used parts of the DAZ 3D Cityblocks to arrange me the scene. Again i took lots of the models apart and reorganized them to make the buildings look the way i wanted. Knowing that quite some Photoshop work would be laid on top of it all. Vue already started to act up because of the load. So i decided to leave that behind and concentrated on the atmosphere aspect of the scene. I already had a really beautiful cloud setup and lighting. I knew i had to do something with it. Soon after that i felt a deep pain in my brain when i saw the needed render times for that atmosphere. I started a test render for those clouds and the atmosphere and it took ages. I did the render just to see how it would look in the end. I were like 60-70hrs when it was done. And the clouds still looked nice on 5000px wide.
February 2010 i picked up the project and really started to work on it. Building up the city elements and experimenting with the tons of ideas i got when i worked on it. Finding the right position for the camera wasn’t an easy task here. I already was playing with the idea of making a camera mapping animation out of the project. Friends are calling me ‘sick’ and ‘lunatic’ now. But that’s the price you pay. If i would have known how much work i had to invest… i guess i would have stopped right away. But i didn’t know and when i was already working on it… i wanted it to be done right.
Early March was the time i started to render the final parts for the Photoshop work. Starting with the atmosphere and the background city. The atmosphere and background elements were rendered on a slightly higher quality than the foreground elements since the lighting and clouds needed to look good. Without too much noise and everything. It was a painstakingly 90hrs render. It took me 5 days to render it. Thank god for the resume ability of Vue. But it was worth the wait! When it was done i had really good multipass material to work with. All the other foreground elements were rendered in roughly 30hrs. Light and atmosphere did not require super high settings so i turned those down a but. All of these renders were done with multipass options. The ultimate freedom for the Photoshop work.
With the main renders done i started to stitch everything together in Photoshop. That was the easiest part. I already had several hours into the Photoshop work when i accidentally overwrote the Photoshop file with all the layers. §”4%&=? awesome! In the end i would say that it was good. I had the chance to redo some of the work steps and saw that i also had an alternative way to do certain operations. That lead to a better picture quality in certain areas of the sky. Nonetheless i wasn’t happy when i found out that my PSD was ruined. That was the first time something like that ever happened to me. Normally I’m very careful with my PSD files.
With the Photoshop work going on i discovered possibilities in the picture that i had to take. So i dug out Vue again to add even more details. Again multipass was helpful to easily place the new elements in the picture. The ultimate freedom! The Photoshop work was a lot of fun and seeing worlds building up in front of your eyes is always very satisfying. I was thinking about the fact that i really would love to see this in moving pictures.
I also thought that i must be crazy. All the ideas i had in mind for an animation. All the time i would need to realize these ideas! Yes, crazy! However! Late march i started to play with Vue and made first experiments with a possible camera mapping animation for the picture. The picture was pretty much done, except for some stylistic things and very small details.
Now camera mapping is not a thing i would say I’m an expert in. I’m not exactly firm in 3d modeling and kept the ingredients from the original Vue scene pretty much untouched in Photoshop. That means i did not add extra elements to the buildings etc – i only added things within the actual building shapes. Always keeping in mind that i ‘could’ be doing an animation of this. To have worked that way really helped me with the camera mapping. Nonetheless i had to take the painting apart again. Foreground, background, middle pieces etc etc etc – so that you would be able to see what actually is behind the big towers. All these textures demanded extra attention and a lot of extra work. That done i could concentrate on the ships!
In April then i was in the middle of the animation work. Man how much time went into the rendering of all the different passes. Not to mention the test renders! Not to mention the disk space needed! I rendered everything in uncompressed AVI format. 5.6gb for 40 seconds of film in 1920×1038. And i had to split the renders in the middle because when i rendered it in on task it produced a weird error and played the movie not like it was supposed to. So a lot of stitching of movie files going on. Not to mention that After Effects can be a true pain to work with. Tons of crashes! But somehow i got through.
Early May i was pretty much done with the animation itself and saw how i could get it polished perfectly in After Effects. I wanted to add a bit of dirt to the lens and found some helpful tutorials on YouTube. The internet generally is amazing for tutorials… even for video stuff.
With the animation done i got back to the painting and refined a few more things on it. That makes it look a tiny bit different than the animation. Nonetheless i’m very happy with both results and never thought i would be able to pull all that off.
While ‘Phoenix Rising’ is the actual project name i found it interesting to give the city a name too. ‘Hadley’s Hope’ is of course the name of the camp on planet LV426 in James Cameron’s ‘Aliens’. I liked the idea of taking that camp and its story out of the ‘Aliens’ context and wondered how that colony would/could look after 1000 years.
Oh a lot of text and it could be so much more! Hope you enjoy the picture, the animation and the whole world you can discover! It was quite a journey to explore and create it! Ultimately it does satisfy m on all level. It’s again a personal achievement i never thought i would be able to pull off. That’s a good thing.
Special Thanks: http://www.greendjohn.net for his awesome music! His piece ‘Windcatcher’ was perfect for my project and conveys exactly the atmosphere i wanted.
Hope you guys enjoy this shorty. For me this is a special animation since so much time went into it. It was the most complex endeavour i ever did and it was worth it!
5000px wide – Photoshop – Vue – After Effects – Infinite Number of Hours
It’s been quite a while since my last try in animating a painting of mine. While the older tries were quite respectable i really wanted to push it this time. I read, heard and saw a lot about camera mapping and its theory. Now Vue has the ability to do camera mapping (also called camera projection) too. This allows you to lay a painting on a geometry and allows you to create limited camera moves with nice perspective shifts. Depending on how much work you spend on it. I surely spend a lot for this one.
I worked on this project for almost 2 months. Not on and off though. Partly because the rendering out the different elements took ages. Especially the volumetric things like fog and clouds. And these were rendered on very low quality settings. Since motion blur is smoothing out certain things it was not too important to render the volumetrics in unnecessary details. While the rendering of the projected painting took 6hrs for 511 in 1080p frames, the fog pass took about 12-15hrs for 511 frames. And i didn’t render it once. I had a lot of testrenders for each of the passes. Now i can roughly estimate how much CPU power a big VFX studio must have.
I chose my Red Dawn painting because in the painting i didn’t change much of the actual Vue render. So the geometry in the Vue file still fitted the painting nicely. I removed the forground element though since it wasn’t a good addition to the camera move i had in mind. I already had an animation project in mind when i did the painting. Now i had the right ambition and time.
A lot of postwork got also done in After Effects. Especially the stitching of the different elements. The blending of the render passes. Vue is able to render out the animations in uncompressed avi format. That means for 511 frames in 1080p it resulted in a 3gb file. Unfortunately the files were corrupted and not to open by any player. I reopened these files in VirtualDub, which was able to read the files, and saved them through VDub as avi again. That made the files recognizable for all players and After Effects. I don’t know what was going on but as soon as the animation video file reached 1gb, it made them uneadable. Maybe some avi internal limitation thingie from ancient times. I have no idea.
Ultimately i must admit that i’m not 100% happy with the end result. But that’s because of technical and time issues. You could work forever on stuff like that. Nonetheless it is a nice step forward in comparison to my earlier tries.
Hope you guys enjoy this shorty. For me it’s always a special thing to see an animation of one of my paintings. It’s like bringing these static pintings to live. That’s a cool thing!
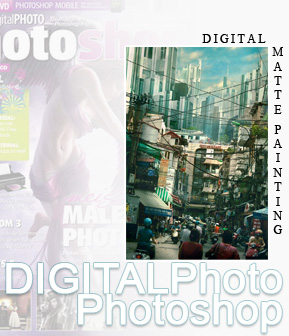
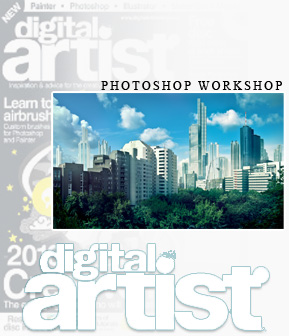
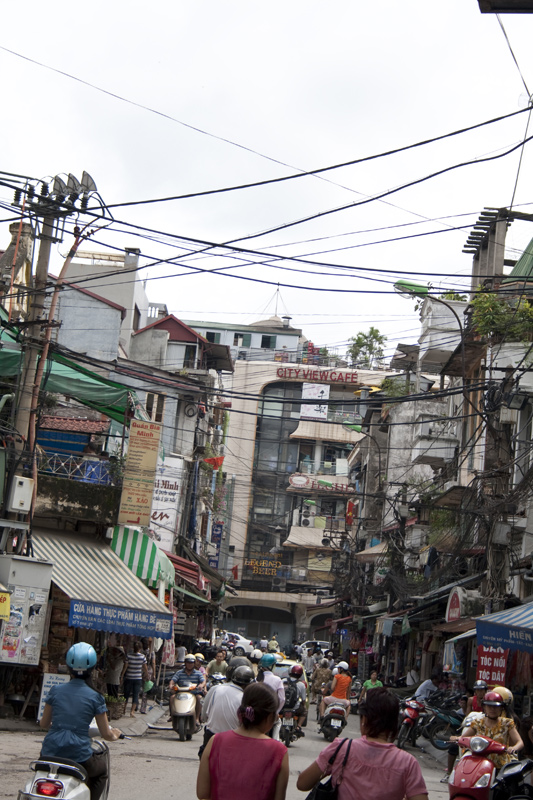
DIGITALPhoto Photoshop hat mich eingeladen einen Digital Matte Painting Workshop zu verfassen für die ausgabe 02/2010. Das magazin erscheint alle zwei monate und ist randvoll mit nützlichen tips zum thema bildbearbeitung. Das bild welches ich zu diesem workshop erstellt habe kann man sich hier mal ansehen. City View war anfangs nur eine inspiration zu einem bild von Kai Bellmann, einem freund der vor kurzem in Vietnam unterwegs war. Dort hat er einige sehr schöne fotos machen können. Unteranderem eben auch diese strasse. Glücklicherweise hat das magazin angeklopft und ich hatte die perfekte gelegenheit etwas mit diesem foto anzustellen. Dabei habe ich versucht dem leser ein paar meiner techniken im feld Digital Matte Painting näher zu bringen.
Vielen Dank an DIGITALPhoto für diese möglichkeit.
Schaut mal rein. Es ist durchaus einen blick wert!
Digital Artist is still a very young magazine that comes from the same publisher like the Advanced Photoshop Magazine. The Digital Artist Magazine focusses on a more wider spectrum of tools though and gives you the chance to explore a wider spectrum of artists. In case of the workshops it shows you how to combine different tools in one artwork and how to seamlessly combine the various elements the different tools give you. In my case i got invited to write a workshop about extending photos. In that particular case i took some Digital Matte Painting techniques to get things done. I took a fairly boring snapshot i took in Berlin and added a sort of futuristic skyline to it. Nothing too exciting too but sexy enough to get the techniques explained. Ultimately i really like the result. Looks cool. Check it out!
The Digital Artist Magazine invited me to write a workshop about extending photos. I decided to go for Digital Matte Painting techniques and searched my archive for a good plate. I found a nice photo i took in Berlin and it turned out to be a great plate. All the other materials were from my archive too. A lot of buildings from the Frankfurt skyline. Not many skylines here in germany though. Nonetheless i tried myself on manipulating what i had, to make it look different to what i already had in the picture. In the workshop i tried to explain parts of the work process and how to push a boring photo to something more interesting looking. It was fun to do.
This is the result of a workshop i wrote for the german ‘DigitalPHOTO Photoshop’ magazine, issue 02/10. The goal was to create a Digital Matte Painting and to explain the various steps that lead to the final product. For the picture i had a really nice plate from a good friend, Kai Bellmann, who recently visited Vietnam. He captured that nice street view and i really wanted to do something with it. Luckily the magazine came knocking on my door and i had the perfect opportunity to create something. Everything done with Photoshop. No Vue this time. I dig the result and it was something different from the things i usually do. I should do more into that direction.
For all german visitors… the magazine is now available and also includes a character painting workshop from my buddy Gary Tonge. A side by side workshop with Gary… never thought that could happen. :)
I just noticed that it’s far too long since i posted my last picture! It’s been a bit busy here recently. However! The last weeks i’m playing around with Vue 8. And finally i found the time to finish up a pic. There’s no big background story here. I was just testing around. The new clouds in Vue 8 really are a bit better than in Vue 7. It still takes ages to render them… but they look good. In this picture we probably have 75% Vue and 25% Photoshop. I used Photoshop to tweak colours and atmosphere. As well as lighting and fixing some weird render results. Especially edges and such things. Smoothing them out. I also painted a few highlights in and added some subtle textures.
Render Info:
My machine is a i7 920 and 12gb ram. For a 3000px wide render it took 4hrs and 30mins to finish. So yeah. Detailed clouds still are time consuming. And i doubt that will change. The terrain was a procedural. Which needed some time too.
Time flies by! And it seems i say that every year. However… the time is right and i took myself some time to create a nifty calendar for YOUR 2010! Man. 2010 sounds like a Sci-fi movie doesn’t it? Very weird. Now this year the calendar contains completely new works from my 2009 collection. No recycling of older artworks. Even though i’m thinking some of you would have liked it to see some older works in it too. :) In retrospective i’m proud of my work this year. It’s some solid work and the presentation within the calendar looks cool too i think. So if you want to discover a new world every month or you want someone to discover these worlds with you… go ahead and check out the calendar. :) I’m sure it’s something for everyone! Discover…!
This website uses cookies to improve your experience. We'll assume you're ok with this, but you can opt-out if you wish. Cookie Settings & InfoACCEPT
Privacy & Cookies Policy
Privacy Overview
This website uses cookies to improve your experience while you navigate through the website. Out of these cookies, the cookies that are categorized as necessary are stored on your browser as they are essential for the working of basic functionalities of the website. We also use third-party cookies that help us analyze and understand how you use this website. All submitted personal data (through email, comments or the contact form) will be treated confidential. These cookies will be stored in your browser only with your consent. You also have the option to opt-out of these cookies. But opting out of some of these cookies may have an effect on your browsing experience.
Necessary cookies are absolutely essential for the website to function properly. This category only includes cookies that ensures basic functionalities and security features of the website. These cookies do not store any personal information.


 Time flies by! And it seems i say that every year. However… the time is right and i took myself some time to create a nifty calendar for YOUR 2010! Man. 2010 sounds like a Sci-fi movie doesn’t it? Very weird. Now this year the calendar contains completely new works from my 2009 collection. No recycling of older artworks. Even though i’m thinking some of you would have liked it to see some older works in it too. :) In retrospective i’m proud of my work this year. It’s some solid work and the presentation within the calendar looks cool too i think. So if you want to discover a new world every month or you want someone to discover these worlds with you… go ahead and check out the calendar. :) I’m sure it’s something for everyone! Discover…!


